

| Geek Fact |
| Did you know that "Pirates of the Caribbean: Dead Man's Chest," Disney's latest film, is the first movie featuring the new Disney production logo? It is also the first time Johnny Depp has portrayed the same character in more than one movie. Also, for the films release, the Walt Disney Company had the Pirates of the Caribbean rides in Walt Disney World and Disneyland redesigned to feature captain Jack Sparrow, Barbossa, and an appearance by the films' supernatural character Davy Jones as part of the attraction and will be featured beginning on the films opening day. |

|
||
|
Animation Mentor Tips & Tricks:
Track Your Arcs |
||
|
||
|
Okay, before I get started this month, I just wanted to take a second to thank all the people who wrote in with comments, ideas, thoughts, jokes, etc. It was a kick to hear from you, and honestly, kind of weird (but exciting!) to find out that people other than my girlfriend and my Mom actually read this article! From here on out, feel free to continue to hit me up with any thoughts at: tipsandtricks@animationmentor.com A lot of the feedback I got was very positive in terms of last month's deviation into the world of practical "tricks," which seems to have been a particularly nice diversion after so many months of sometimes intangible animation theory. In light of that, how about another trick? I'm kind of torn, here, between feeling like a lot of the tricks that spring to mind are commonly known among animators, and thinking that there are also a lot of newer animators out there reading this article who may not have already been to animation school. Last month's "hide the legs" trick was pretty advanced (again, I wouldn't recommend trying that method until you've animated for a couple of years or so at least,) so this month let's give you newer folks something easier (but not less helpful) to try! TRICK #2: Track Your Arcs!! I'm sure many of you have already discovered the fantastic combination of dry-erase markers and your monitor. Like peanut butter & jelly, prosciutto & melon, and fried chicken & my taste buds, these are two things that were destined to make a great team. For the rest of you, the trick is this: use a dry-erase marker (such as the ubiquitous "Sanford EXPO" or an "Avery Marks-A-Lot") to track your arcs, through time and space, by tracing the movement of your character across your screen. Now, before we go any further, let me quickly touch on a ***VERY IMPORTANT*** difference between a "dry-erase marker," which are traditionally used to draw on white-boards and are easily wiped away, and a Sharpie, which is traditionally used as a non-smearing permanent marker. Dry-erase markers are, as their name implies, easily erased. Permanent markers, such as Sharpies, are.... yup, you guessed it! Permanent! It may sound like common sense to you that one would work well drawing on your computer monitor, and one wouldn't. Well, I think it's important to talk about anyway, because I happen to know of an animator, who will remain nameless but may or may not write a monthly "Animation Tips & Tricks" article for the newsletter of a certain online animation school, who got a little too caught up in the excitement of polishing up one of his shots one night at home. This Anonymous Animator, who may or may not love fried chicken, intelligently kept all of his pens in one jar on his desk (smart, huh?). So, this anonymous animator, who may or may not be.... um.... me, snagged the nearest fat pen out of his jar and started tracking his arcs on his monitor. Luckily, his animation-induced euphoria only lasted for the first two dots before he realized he was marking his monitor with a fat-tip PERMANENT SHARPIE! That's right. Sharpie. Guess what happens when you put permanent sharpie ink on your monitor? It stays there! PERMANENTLY! I... I mean, the Anonymous Animator, had to live with two beady little black eyeballs dotting his monitor for the next few years. So, trust me when I caution you to be extremely careful which pen you use to do this trick, ok? Dry-erase only! Make sure it says dry-erase on the marker, or don't put it anywhere near your expensive screen. Okay, back to the trick... You've likely already heard the importance of building nicely flowing arcs and figure-8 curves into the movements of your characters. (If you haven't, shoot me an email, and maybe I'll make that my next topic!) That's all well and good from a theory side of things, but practically speaking, how do you make sure your arcs are nice? Well, there are a couple of ways of doing this (many animation programs have a ghosting function you can use to see the arcs, for example, but I find this difficult to use in complex motions,) but my favorite, and the favorite of most professionals that I know, is the simple act of plotting a dotted line on your monitor with your trusty dry-erase marker. You should be thinking about your arcs in the planning stages of your work. Certainly, in the thumbnails you should be considering whether or not the head will move in an over-arc or an under-arc, or how the tail might swish back and forth with the tip tracing a figure-8 pattern. Next will be the blocking stage, and you should DEFINITELY have your arcs in mind when blocking in your keys and breakdowns. One of the primary functions of the breakdown, in fact, should be to define the arcing path of the hips and limbs, in my opinion. However, no matter how well you plan your arcs, and how well you block in your scene, your arcs are not going to be perfect most of the time. You might play your scene back and think, "wow, my arcs are great!" but if you really get in there and track them, and truly smooth them out, you will see a subtle but powerfully fluid difference in your next render. Here's what I do: Once I feel like I'm about 80-90% done with my work, I bust out my trusty Marks-A-Lot or my Expo, and get to work. First, make sure you're working from your camera view. Those of you creating in-game 3D work for video games will have an even bigger challenge as you'll track the arcs from many different angles, but for many of you, your animation will end up being seen on a flat 2D surface (a computer monitor, a TV screen, a movie theater screen, etc.) In those cases, the only camera we're worried about at this moment is the actual camera view, because that is the arc that will matter. So, in my camera view, I'll first select the hips of my character. In Maya, I can select the nurbs sphere that I use to control the placement of the hips and hit the "w" key, putting me into "translation" mode. This is nice, because it brings up your little multi-axis icon, and that icon has a little box in the center of it. This is an easy way to see the exact center of the hips on any given frame. So, I'll go to any parts of my scene where the hips are doing something big. Let's say my character is going to ring a bell by pulling down on a rope. Through planning my scene, I've discovered that all of the force the character is going to use to pull on that rope is through a wave action that moves from the hips, through the spine, and finally out into the arms, and that wave action is caused by a clockwise outwardly-spiraling arc of the hips. Wow, was that confusing? I wonder if I could possibly have chosen a more complicated example for this... jeez. Well, it's too late now, folks. We're in too deep. See, we're already two paragraphs into this example, and I haven't eaten dinner yet (nope, not fried chicken tonight... I wish!) so there's no way I'm going back now! We'll just keep slogging through the bell-pull. Trust me, we can do it... Anyway, the hips move in a clockwise spiraling arc that goes like this: They move back and down a bit, then up, then forward, then down and forward, and then down and back, and then start to move up and back. Jeeeeeez. That was even more confusing than before. Holy moly. Are any of you following this at all? Basically they're moving in a circle, but it's getting wider as you move through time. Okay, never mind. Let's just move on before I confuse you any more than you already are... So, in my blocking, I'll hopefully have the hips traveling in a somewhat circular pattern. However, it most likely isn't PERFECTLY on a nice arc. This is where my pen comes in. I'll go to where that specific hip motion begins, select the hips, hit "w," and then put a dot right in the middle of my translator icon. Then I'll do the same thing on the next frame, and all the following frames until that motion is pretty much done. Now you just play the "connect-the-dots" game you might have played as a kid. Guess what you'll find? An arc vaguely resembling a nice spiral, but also vaguely resembling a spiral drawn by an over-caffeinated monkey. You'll probably see that some dots are too high or too low, and the resulting path you traced has jitters and bobbles and wobbles and bends. It might even double back on itself, or hit sharp 90 degree corners and careen off to the next key. This is normal, and will be worse the less-experienced you are, so relax. The next step, is to draw onto your monitor the path that you WANT to have. You can do this with a different color, or you can just amend the path you just drew. Either way, the goal is to end up with a nice drawing of the spiral curving arc that you'd ideally like to have. Now all you do is go back to your keys and breakdowns, and readjust the hip controller to always be on that path. Sometimes you'll have to do this on every frame, but usually you can just adjust the key poses and breakdowns. Most likely these will be subtle adjustments, but sometimes you really screw things up early on and this step can occasionally become a major construction zone, with some serious reworking needed to make the path work correctly. If so, just suck it up and do it, because believe me - it'll make all the difference. In fact, I think a lot of the time, the difference between amateur animation and professional animation is nothing more than some really clean and pleasing arcs in the motion. It can truly make all the difference. Since the hips can often affect the position and movement of the rest of the body, it's important to begin there before moving on. Once I've got the hips on a nice path, I can move on to the rest of the body. For this scene, my next targets would be the hands. I'll select the right hand controller, hit "w," and go to the frames where he's lifting his hand to grab the rope. I'll track each frame, connect the dots, rework my path, and make sure his wrist slides nicely along it. Most likely, this will be a skinny, interrupted figure 8 path, with the hand moving up slightly higher and further forward than it needs to go, and then arcing over and back down a bit as it grabs the rope. In any given scene, I'll usually do this exact process with the following points: 1. Hips (unless the character is pretty much just standing there) I think this really hit home with one of my Yoda shots. I had him doing all these laser-blocking moves as a crowd of clone troopers were firing at him, and I thought it looked pretty cool. Then I realized I was being lazy, and I kicked myself in the butt and got in there and tracked the tip of that lightsaber for every single frame in the shot and made sure it was always on flowing looping figure 8 patterns (which were completely separate from the arcing path of the hands, in order to loosen the saber up a bit and not look like a stick glued to his palm.) Holy cow - what a huge difference! I couldn't believe how much more appealing it looked, how much more clear the actions were, and how much easier it was to watch. That's when I added number 7 (props/weapons) to my list of things "Shawn Will Always Track." Every once in a while, there may be other things to track, such as an elbow, or even occasionally a shoulder movement or something, but most of the time you won't have to get that in-depth. Does everything move in perfect arcs in real life? Well, not always 100% perfectly, no. But generally speaking, everything organic on this planet moves in an arc MOST of the time. The only things that don't move in nice arcs are machines built by man, maybe some insects (which are most likely just moving in arcs too small for us to register), and our eyeballs, which to me, are the only "darting" movements on the body that could be thought of in a more "robotic" way. From the tip of a tree swaying in the wind to the throwing arm of a baseball pitcher -- every living thing moves in an arc. Whether we know it consciously or not, that's how we're used to seeing the world, and believe me, if the audience sees some jagged angled "arcs" up there on movie screen, or on their television, or in their video game, they are going to feel that it's fake. Maybe even subconsciously, but they'll feel it. So, get out your dry-erase markers and start connecting some dots! I bet you'll be surprised at what a difference it'll make. Okay, that's it! If my calculations are correct, next month will be the one year anniversary of this article, (wow!) so next month let's all celebrate together. When you read next month's article, read it with a bacardi anejo y coca in one hand, and some fried chicken in the other. That's how I'll be writing it! Keep animating! And, as always, have FUN! -Shawn |

 |
|
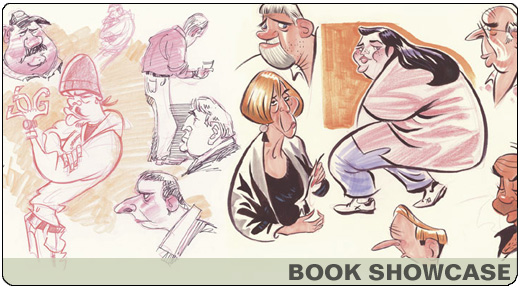
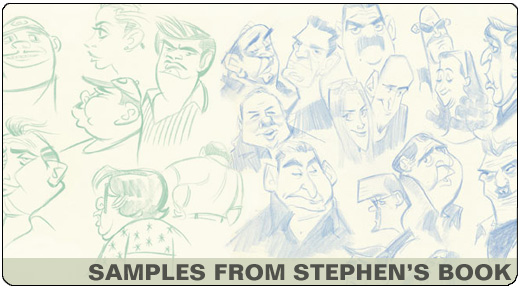
Book Showcase: Stephen Silver's Sketchbook |
|
Bio of Stephen Silver Animation Mentor: Stephen Silver:
Animation Mentor: Stephen Silver: Animation Mentor: Stephen Silver: Animation Mentor: Stephen Silver: |
 |
|
July US Movie Releases
Your inside guide to US movie releases and the visual effect companies who made movie magic.
|
|
Pirates of the Caribbean: Dead Man's Chest
U.S. Release Date: July 07, 2006
Visual Effects Studio: Industrial Light & Magic Synopsis: Captain Jack Sparrow owes a blood debt to the legendary Davey Jones, captain of the ghostly Flying Dutchman. Captain Jack's dilemma puts a damper on Will Turner and Elizabeth Swann wedding plans. |
|
Little Man
U.S. Release Date: July 14, 2006
Visual Effects Studios: Cinesite (Europe) Ltd. The Moving Picture Company Synopsis: A wanna-be dad mistakes a vertically challenged thief on the lam as his newly adopted son. |
|
Monster House
U.S. Release Date: July 21, 2006
Animation Studio: Sony Pictures Imageworks Synopsis: Three teens discover that their neighbor's house is really a living, breathing, scary monster. |
|
Ant Bully
U.S. Release Date: July 28, 2006
Animation Studio: DNA Productions Synopsis: Based on the children's book of the same name and follows a young boy who after tormenting ants one too many times is magically transformed into the size of an ant. |