
|
|
 |
|
|
|
Did you know ILM's visual effects in Iron Man were so convincing as the real thing that the film's director, Jon Favreau, once gave ILM notes to improve their VFX in a scene only to be notified that the scene was all practical effects that he filmed on set? |
|
|
|
|
|
|
|
 |
|
|
|
 |
|
|
|
Bringing your work back to blocking  By: Shawn Kelly By: Shawn KellyHello there! 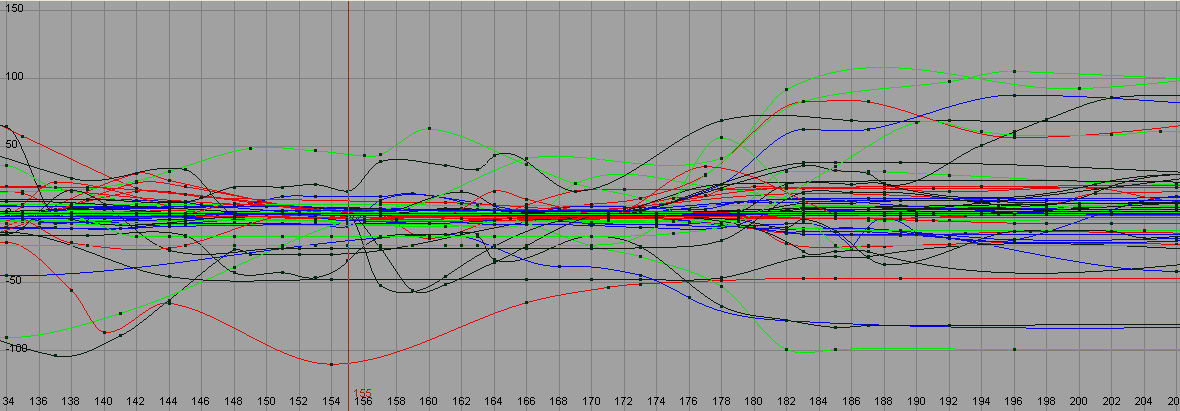 Click To Enlarge Click To Enlarge
Ok, not the "cleanest" keys in the world, but a lot of the time, your curves might end up looking like this for a variety of reasons. I try to think of my key poses as "drawings," and tend to keep my keys all on the same frame so that one pose/drawing won't ever get messed up, but after I'm out of my blocking phase, and all of my timing and ideas are nailed down, then I stop worrying about that and shift my focus to just making the shot as dynamic and clear as I can. Oh, I just thought of a whole other tip! Uh oh, buckle up for a patented "Tips & Tricks Tangent".... This will be REALLY quick. Check out the selected curves/keys below. See the crazy mess of tangents? 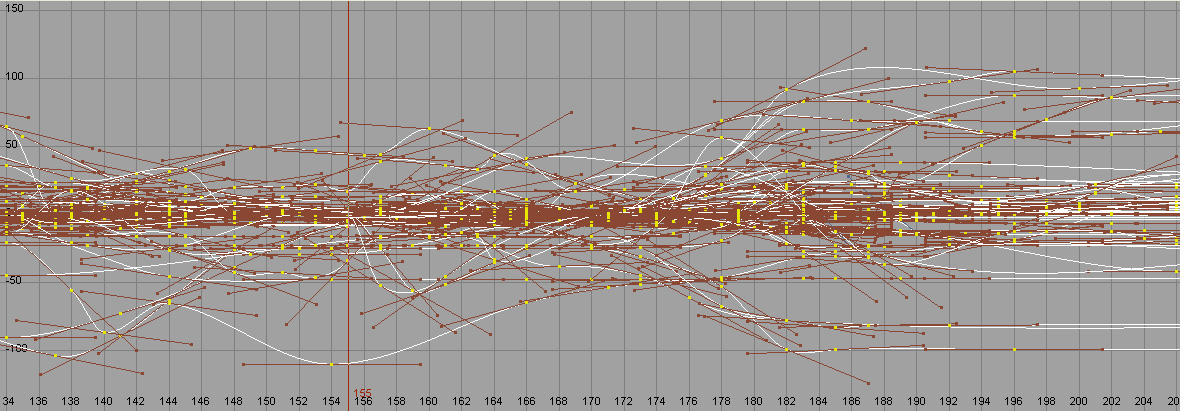 Click To Enlarge Click To Enlarge
I don't know about you, but I can't even look at that. It's too confusing to see where my keys are. So my "mini-tip" is to make a hotkey in Maya (or whatever you use) that will turn your key tangents off. Like so: 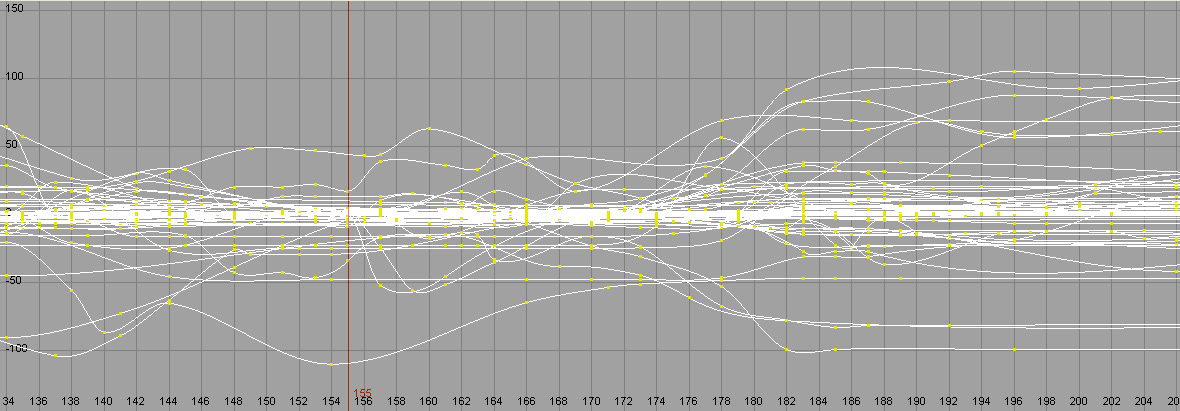 Click To Enlarge Click To Enlarge
Ahhhh, isn't that better? So much easier to look at. Creating a hotkey to flip back and forth is a lifesaver when you are working in the graph editor... Ok, back to our regularly scheduled article: let's say that frames 149-175 represents the bit where our guy runs to the television. The part we need to ditch, and replace with a mid-air excited jump/spin. 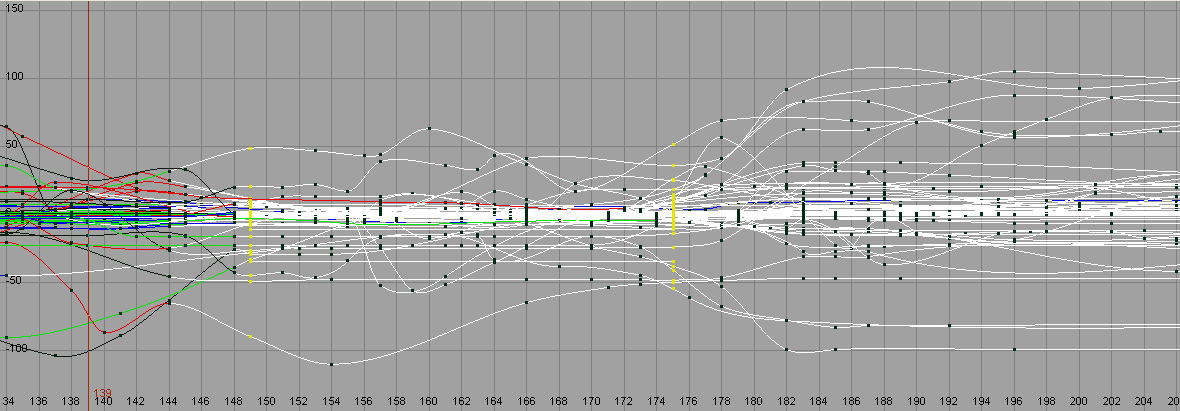 Click To Enlarge Click To Enlarge
The first thing you'll notice about the image above, is that I've saved a key on EVERYTHING in my scene (the guy, the props, anything he interacts with, maybe even the camera) on frames 149 and 175. (You'll notice they are selected in the above image). This is the first step to walling off your construction zone. With these keys in place, you can blow away everything in between them with a fair degree of safety. The only time this would screw you up would be if you didn't have any keys saved within a few frames of these frames, in which case I'd guess there's a decent chance you're letting the computer do too much of your in-between work... Anyway, now you can blow away the stuff in the middle:  Click To Enlarge Click To Enlarge
Now, sometimes you'll need to do a little minor clean-up, but in theory, the first 149 frames should look exactly the same as they did a moment ago, as should everything after frame 175. This is a good start, and you've just given yourself a chunk of space to block in a jump/spin. However, you have this problem of your character being in a constant state of motion as you are trying to animate him. He'll slowly be morphing into the pose at frame 175, right? Well, there are probably a few ways to work around this problem, but the way I like best is to simply copy the pose from frame 149 to the frame just before my construction zone wall, which in this case, would be frame 174: 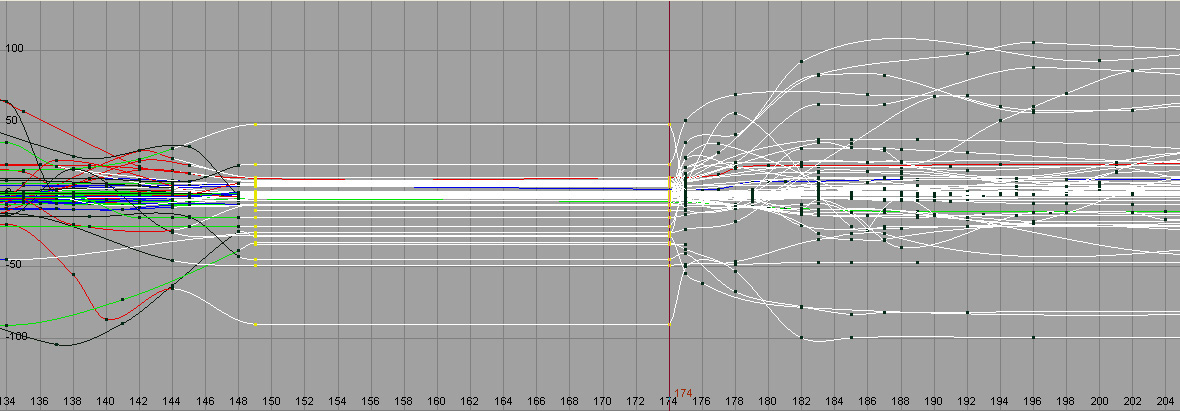 Click To Enlarge Click To Enlarge
Ta-daa! Now you have a blank canvas upon which to paint your new and (hopefully) improved masterpiece. All I did was go to frame 149, and hold down my middle mouse button as I scrolled to frame 174, and then I simply saved a key on everything. This is a great and easy way to copy/paste your poses as you work. As you save each new pose of the jump spin you are now animating, you can copy/paste it to frame 174, giving you a constantly updated "flattened area" to work in. Obviously, you'll eventually have to replace the key at frame 174 (or just delete it) in order to flow smoothly into 175 and all the following original animation. ============================================ SCENARIO TWO: THE SHOT: same shot THE DIRECTION: "The shot's looking great, but I really want him to run to TV a lot faster. Like, twice as fast. And have him kiss it a couple times when he gets there." Ok, so this is kind of similar, but creates a whole new problem for you. Now your client or supervisor actually wants you to keep the guy running to the TV, but he wants it to happen faster, *AND* he wants you to add some kissing in there. Obviously you can't just blow away everything in between 149 and 175 this time. Well, that's not true - you *can* if you want, but this sounds to me like it'd be silly to have to completely rework that section when you mostly just need to change the timing and add a couple little things in. For this, you'd build your construction zone just like in the first scenario, but instead of just deleting your keys, you need to do something new. You need to clean up your curves. Basically, all you do is step through your animation and examine it the way you would examine video reference. Look for any time something important happens, or something changes direction, or it could even be something technical, such as a frame where some constraints turn on or something. On any frame where anything absolutely essential happens on any important part of the body, save a key. On *EVERYTHING*. If he's running, and his foot picks up off the ground and you like that pose, save a key on every controller on his body: 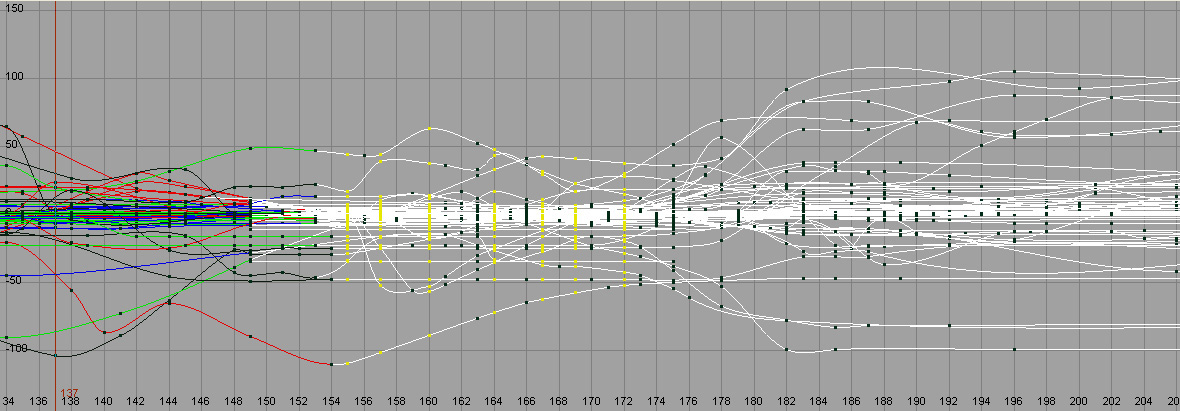 Click To Enlarge Click To Enlarge
The frames with the yellow keys happened to be the ones I felt were important to keep around. Even though many controllers didn't have any keys saved on them on these frames, I included them anyway. That's a really important part of this process. Next, it's time to delete everything that is in between the keys we just saved, which leaves with this: 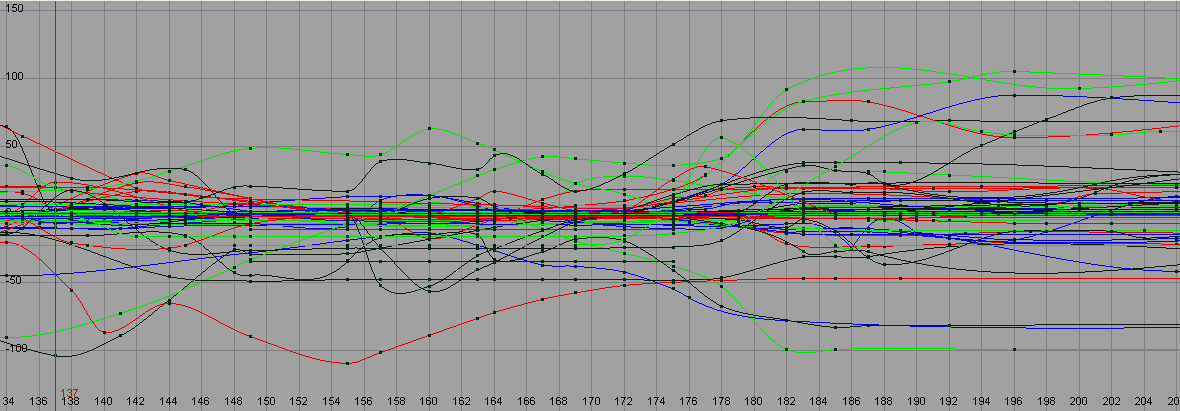 Click To Enlarge Click To Enlarge
If you play blast this, the animation should look pretty much exactly the same as it did, minus a few minor nuances. If it looks wrong, then you've missed some controllers or missed an important frame you should have kept around. The point is that we've taken our garbled spaghetti curves and organized them into something we can truly work with! Now it's SO easy to speed up this bit of animation without screwing up your poses. Simply select the first one you've kept, which in this case is frame 155: 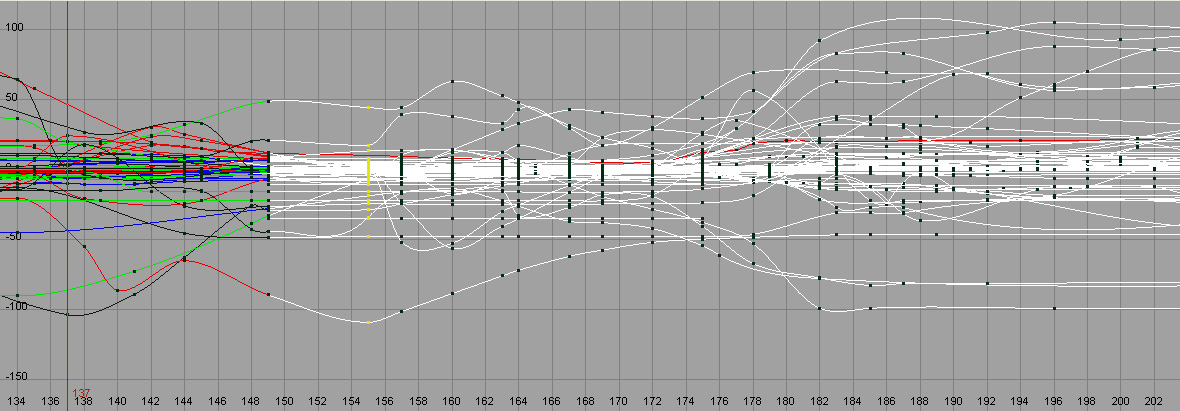 Click To Enlarge Click To Enlarge
Now zoom waaaaay out in your graph editor, so you can see everything that comes after this key: 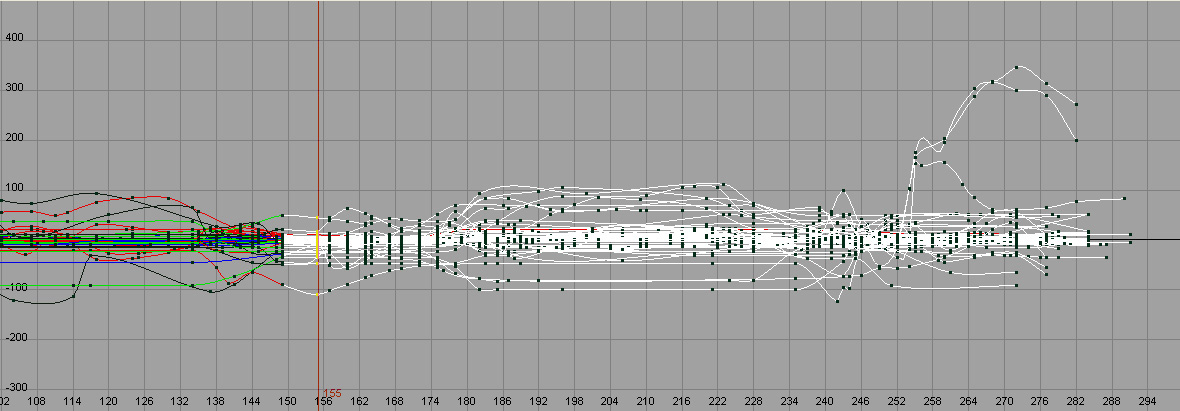 Click To Enlarge Click To Enlarge
Since you've selected the keys at frame 155, it's still easy to see which key it is that you're working with. You can also put your timeline to frame 155 which gives you that nice red line as a good reference point of where it is you should be worried about. At this point, just make sure you have selected frame 155 and every key that comes after it: 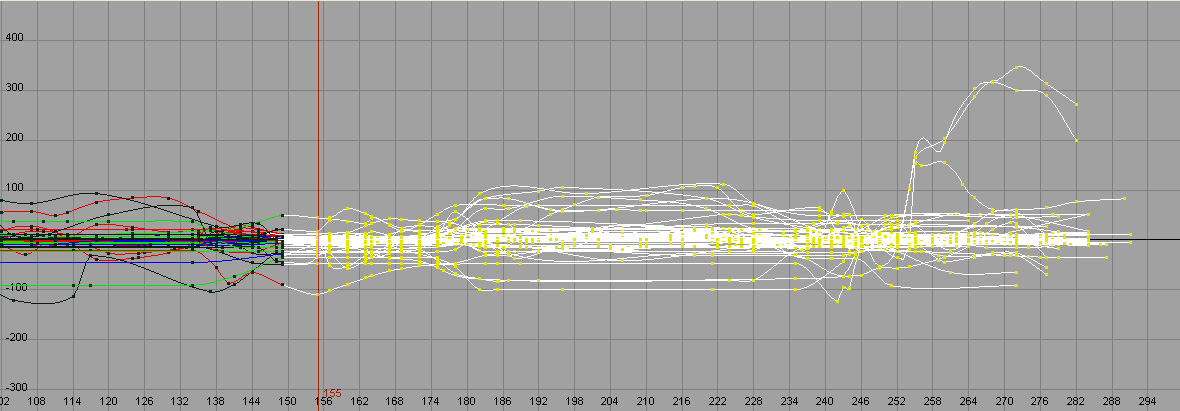 Click To Enlarge Click To Enlarge
And then just slide everything backward as much as you need to in order to properly speed up the first bit of your run (the part between 149 and 155): 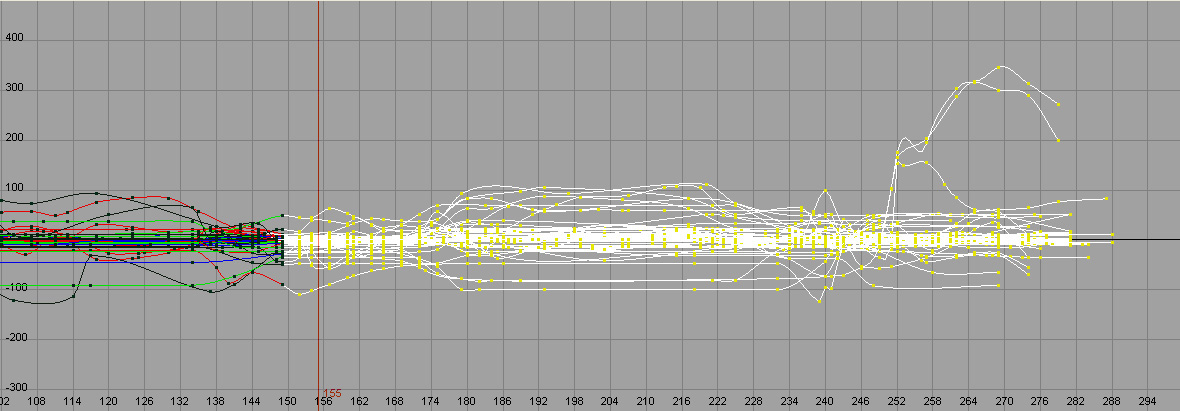 Click To Enlarge Click To Enlarge
Then you just deselect the keys at 155, which should leave everything selected from the next key onward, and slide that back as much as you need to. And so on and so forth. Eventually, you'll have a faster run, AND a blank area of keys you can put a kiss into, and eventually hook back up to what was once frame 175, but what now might be 165 or whatever. Some of you might wonder why I wouldn't just select the run animation and scale the keys in order to speed it up. Honestly, I might try that quickly to just see how it looks, but I just don't have enough manual control in that situation, and more often than not, I won't be satisfied with the results. Aside from the fact that a faster run will probably need extra time easing into the run and out of it at the end (rather than simply scaling it uniformly), the more important thing for me is that a pose that I love that will help the run be clear and strong, or really show his weight or force might end up in between a frame and never properly show up on screen. Your poses are your babies in animation. You've hopefully put a lot of thought into their creation, so cherish them, and avoid automated stuff that might hide or destroy them. That'd be my advice, anyway. ==================================================== Hopefully that makes sense. In both cases, it's important to think of your character as one unit rather than a collection of separate controllers. Because you've already started polishing him up, you want to salvage as much as you can, and this "construction zone" method of bringing a section of your animation back to what your blocking should look like is a terrific way to deal with late-in-the-game change requests from the people you are working for. Well, that's it! Hopefully this is new to some of you and you find it helpful. Next time we might jump back to the Q&A format as I have a lot of great questions to address, or maybe I'll do a little half-and-half. Feel free to email me and let me know which you prefer! Keep animating, and as always, have FUN!!! shawn :) |
|
|
|
|
|
|
|
 |
|
||
|
|
|
|
||
|
|
|
|